

How To Install Ubuntu On Virtualbox Windows 7
How to Install Ubuntu on VirtualBox: Detailed Overview

Whether y'all are looking to endeavour out some software, set for migration to Linux from Windows or macOS, test applications, network, or otherwise, you need to install Ubuntu on VirtualBox . Installing Ubuntu on VirtualBox as a virtual car (VM) has a lot of advantages – you lot tin can create a snapshot and gyre dorsum changes to the appropriate VM state if something goes wrong, clone a VM, copy a VM to another automobile easily (all VM data is stored equally a fix of files), or run a VM on different host operating systems that are supported by VirtualBox.
Today's blog post explains how to install Ubuntu on VirtualBox. The operating system (OS) runs on a physical car is referred to as a host OS, and the operating system run on a VM is called a guest OS (Ubuntu in this case). Make sure that VirtualBox is installed on your concrete motorcar before proceeding.
System Configuration of the Host Machine
In gild to install Ubuntu on VirtualBox, you lot should accept a physical reckoner with at to the lowest degree four GB of RAM (Random Admission Memory), a hd with at least 30 GB of gratis space (SSD is preferred due to its college performance). Your CPU (Fundamental Processor Unit) must back up Intel VT-ten or AMD-5 hardware virtualization features which must likewise be enabled in UEFI/BIOS. This betoken is especially important if you are looking for how to install Ubuntu 64-chip on VirtualBox.
Downloading the Installation Prototype
You need to download the Ubuntu distribution for installing Ubuntu on VirtualBox. Go to the official Ubuntu website and download the necessary version of the Ubuntu installer. Let's download Ubuntu 18.04.2 LTS – this is the latest long term support (LTS) Ubuntu version available at this moment. You can notice version numbers that are higher than xviii.04.ii, simply they may non offer long term support still. 5-twelvemonth support is provided for Ubuntu LTS distributions (both Ubuntu Desktop and Ubuntu Server). Ubuntu LTS is more widely tested, enterprise-focused and compatible with new hardware.
Click the light-greenDownload button and salve the ISO file to the custom location. In our case, the file proper noun isubuntu-18.04.2-desktop-amd64.iso. Ubuntu 18 is provided only equally 64-bit editions.

Creating a New VM
In lodge to create a new virtual car for installing Ubuntu on VirtualBox, open VirtualBox and clickNew (Machine > New) or pressCtrl+N.

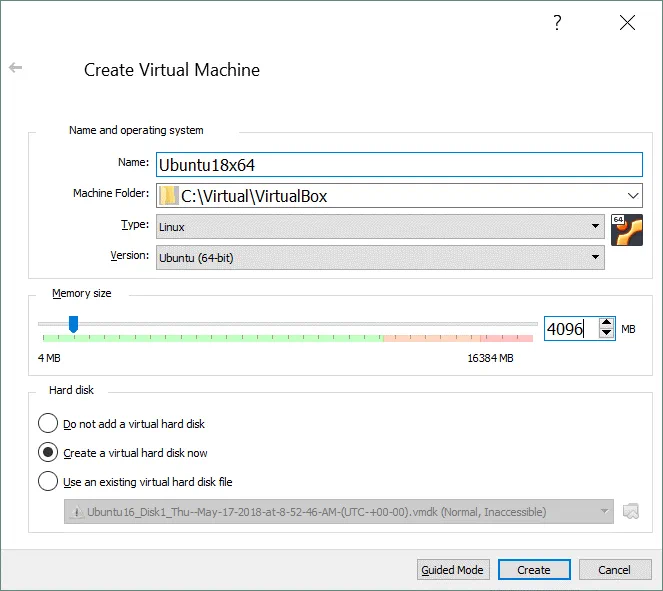
In theCreate Virtual Machine screen, set the options for a new VM. In our case of installing Ubuntu on VirtualBox, the new VM options are the following:
Name: Ubuntu18x64
Automobile Folder: C:\Virtual\VirtualBox (try to use disk D, Eastward or other not-arrangement partitions if yous have them).
Type: Linux
Version: Ubuntu (64-bit)
Retention size: Set at least 1 GB of RAM. As our physical machine used in this example has 16 GB of RAM, we can gear up 4 GB of RAM for a virtual machine to install Ubuntu on VirtualBox. You should get out plenty retention for your host operating system to operate normally.
Select theCreate a virtual hard disk drive now option.
HitCreate to proceed.
On the nextCreate Virtual Hd screen, fix the virtual disk file location, for example,
C:\Virtual\VirtualBox\Ubuntu18x64\Ubuntu18x64.vdi
Thefile size of the virtual disk: 20 GB or more.
Hd file blazon: VDI (VirtualBox Deejay Image). Permit's select the native VirtualBox virtual disk format.
Storage on concrete hard disk: Dynamically allocated. This option allows you to salve space on your physical disk until the virtual disk grows to its maximum allocated size.
HitCreate to finish creating a new VM to install Ubuntu on VirtualBox.

VM Configuration
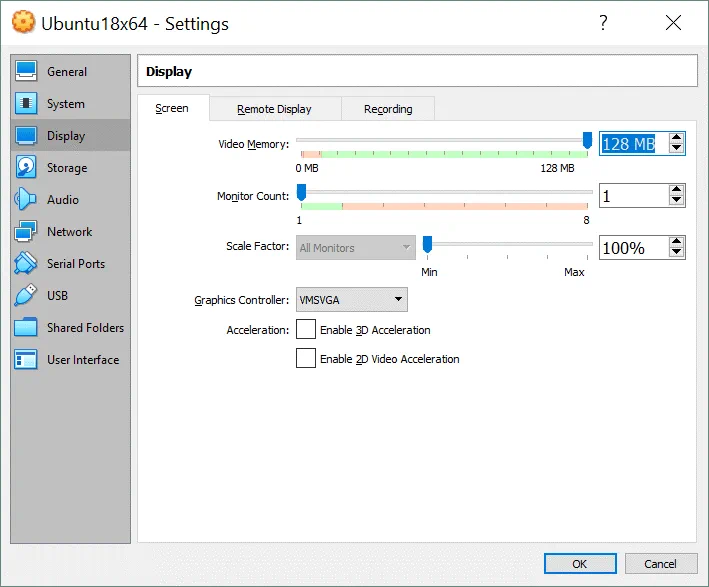
A new virtual car to install Ubuntu on VirtualBox has now been created and its name is displayed in the list of VMs in the master VirtualBox window. You need to edit VM settings after VM cosmos. Select your new VM (Ubuntu18x64 in this case) and clickSettings (Machine > Settings or printing Ctrl+South).

In theSettings window, become to theDisplay section and select theScreen tab. Set video retentivity to 128 MB. Otherwise the Ubuntu installer may hang on some installation steps, keyboard may not response etc. You tin enable 3D acceleration.
StrikingOK to save settings.
Select the Boot Disk Paradigm
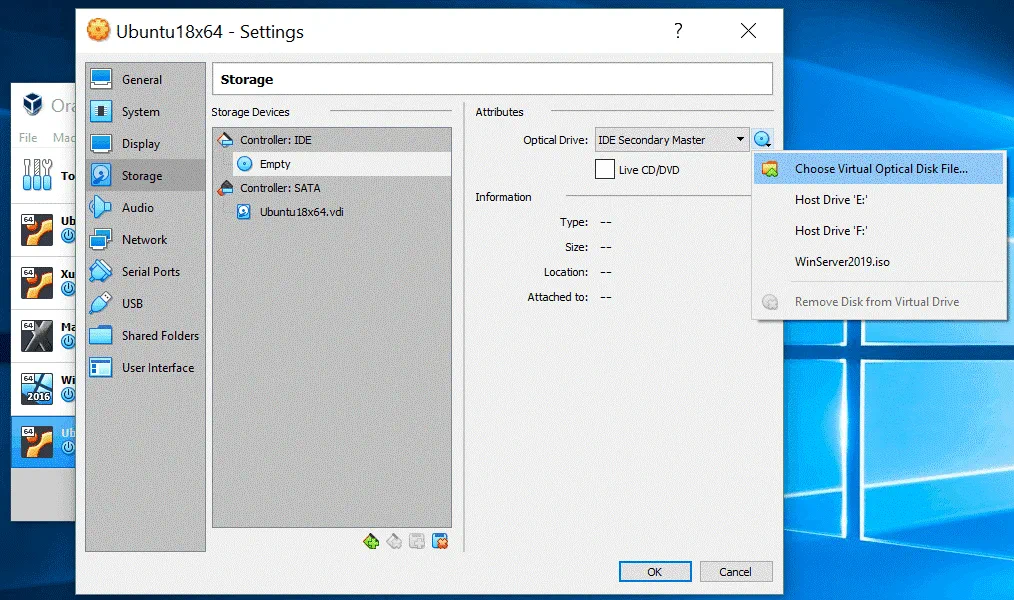
You don't need to burn the ISO paradigm onto a DVD disk as you would for installing an operating arrangement on a physical machine. Yous tin mount the ISO image to the virtual DVD bulldoze of the virtual machine and kicking a VM from this media. Let'southward insert theubuntu-18.04.two-desktop-amd64.iso paradigm that was downloaded from the official Ubuntu web site earlier, into a virtual DVD drive of theUbuntu18x64 VM. Open your VM settings and go to theStorage section. Select your virtual controller used for connecting a virtual DVD drive (by default a virtual DVD drive is empty). Click theEmpty status and in the right pane near theIDE Secondary Master, click the disc icon. In the card that appears, clickCull Virtual Optical Disk File and browse your Ubuntu installation ISO image file (ubuntu-xviii.04.2-desktop-amd64.iso).
HittingOK to salve settings. At present your VM is prepare to install Ubuntu on VirtualBox.
How to Install Ubuntu on VirtualBox VMs
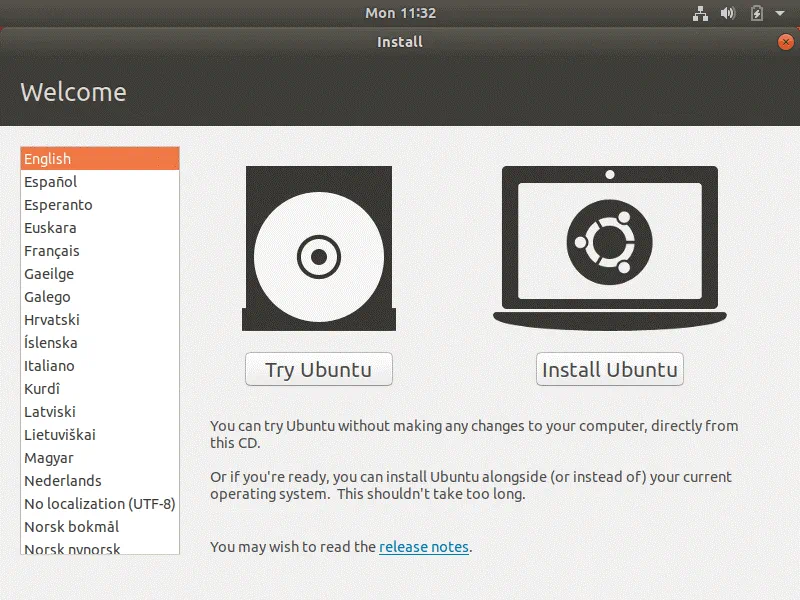
Once the new VM is prepared for installing Ubuntu on VirtualBox, kickoff the VM (Automobile > Beginning). The VM boots from the ISO Ubuntu installation prototype. The outset screen that you can see after booting is the Welcome screen.
In the left pane selectLanguage for displaying information in the installer interface. English language is selected in the electric current example. Then clickInstall Ubuntu.
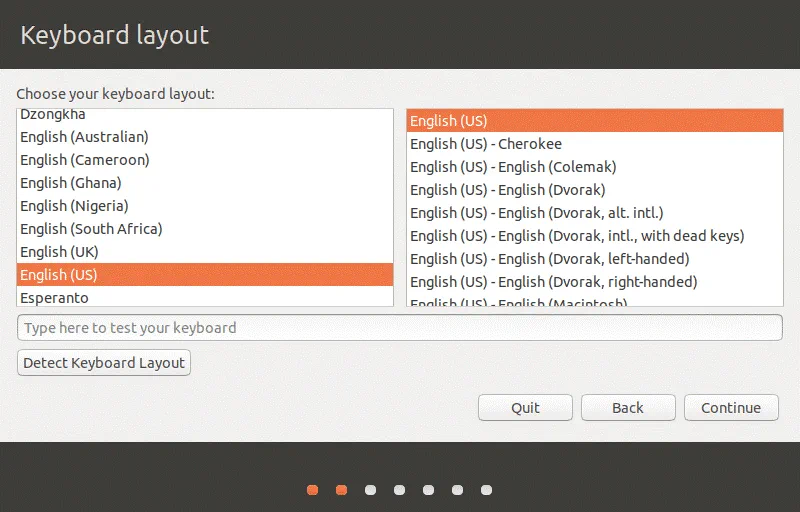
Keyboard layout. Choose your keyboard layout. Let's select English (Usa).
Updates and other software. There are a few options to choose from on this screen.
Normal installation. A spider web browser, utilities, role applications and media players are installed.
Minimal installation. Only the chief components including a web browser and bones utilities are installed.
Let's select the normal installation.
Other options:
Download updates while installing Ubuntu. The Ubuntu squad is e'er working towards making Linux better. That's why after downloading the installer, some updates may be already available. Yous can automatically download and install updates right during Ubuntu installation, letting you relieve time afterwards OS installation. Permit's select this option.
Install 3rd-political party software for graphics and Wi-Fi hardware and additional media formats. Tick this checkbox if you would like to install additional software, such every bit proprietary Wi-Fi drivers, video drivers, some TTF fonts etc.

Installation type. This screen contains options for preparing a disk for Ubuntu installation.
Erase disk and install Ubuntu. This is the default option. All disk space will exist automatically allocated to Ubuntu. If yous selectErase disk and install Ubuntu on VirtualBox VMs, 1 big/dev/sda1 partition is created on/dev/sda. This/dev/sda1 partition with ext4 file arrangement is mounted to the / directory (root directory), though a separate bandy partition is not created. Attending: All data on the virtual disk will exist erased—at that place is no reason to worry most it, however, because an empty virtual disk created previously is beingness used for installing Ubuntu on VirtualBox.
In that location are some additional options:
- Encrypt the new Ubuntu installation for security.
- Utilize LVM (Logical Volume Management) with the new Ubuntu installation.
Something else. Use this selection for manual cosmos of the partition table on your virtual disk which is used to install Ubuntu on VirtualBox.
ClickInstall At present when you are gear up to continue. Then on the confirmation screen, hitProceed.

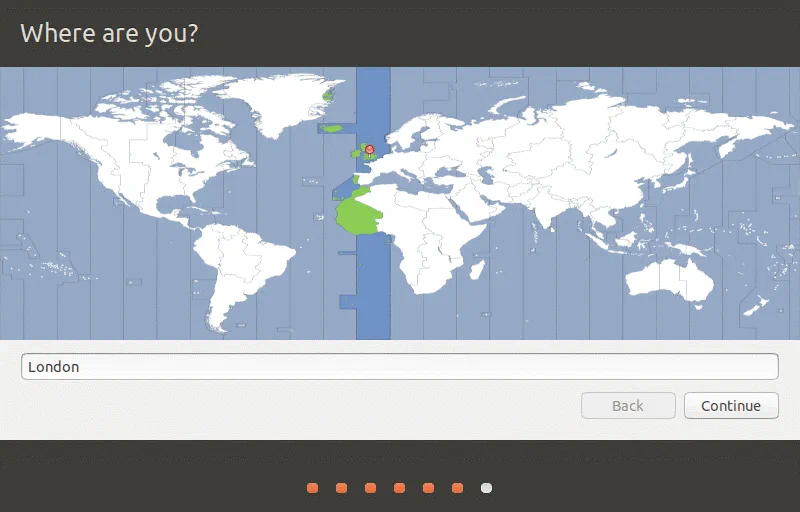
Where are you? Select your location to prepare the time zone and regional settings. The time for your selected region will exist set automatically. Let's select London.
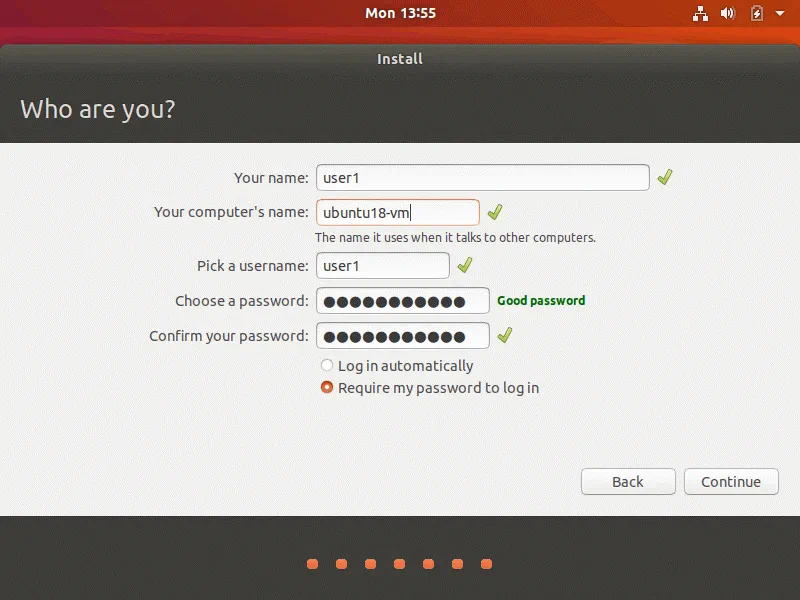
Who are you? Enter your user proper name, computer's name, and ready the password. SelectRequire my password to log in for a higher level of security. In our example, the username isuser1 and the figurer's proper name isubuntu18-vm.
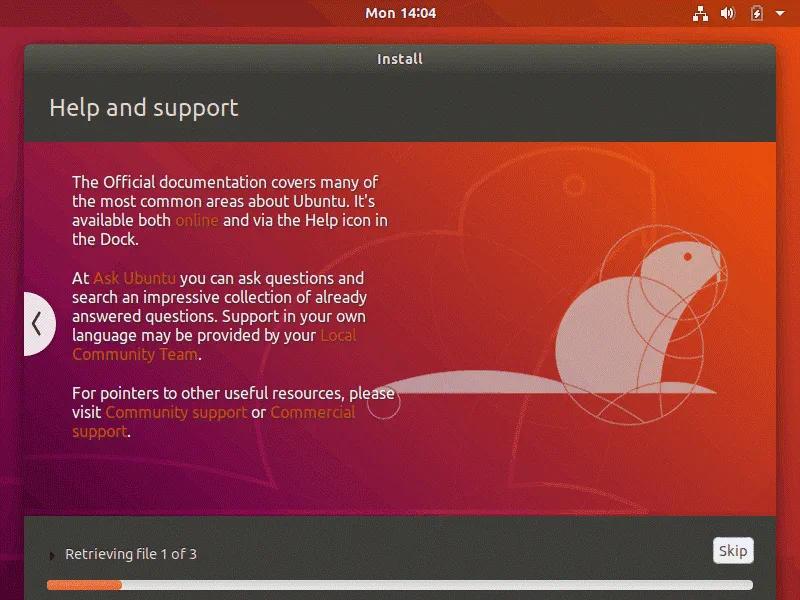
As you tin encounter, useful tips are displayed on the screen during the installation process.
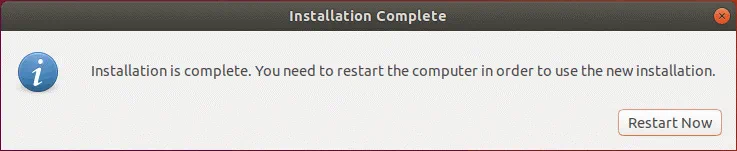
When installation is consummate, y'all will see a notification window. You have to restart your VM with Ubuntu on VirtualBox.
Now you tin eject the Ubuntu installation ISO disk from the virtual CD/DVD bulldoze of the VM.
Data Protection with NAKIVO Backup & Replication
Looking for a powerful yet simple and affordable data protection solution? NAKIVO Backup & Replication provides a rich gear up of high-end backup, replication and diverse recovery features for virtual, concrete, cloud and SaaS environments. Now you lot can perform VMware vSphere fill-in, set up custom disaster recovery workflows, backup Role 365 workloads and even test your Microsoft Hyper-V backups from 1 centralized web interface.
Installing VirtualBox Guest Additions
Ane final step is left to complete installing Ubuntu on VirtualBox. Afterwards the operating system reboot, install VirtualBox Guest Additions, which is a set of drivers and system utilities intended to improve usability and VM performance as well as tight integration with a host OS.
In the VM window, go toDevices and strikingInsert Guest Additions CD image. The ISO disc image that is located in the VirtualBox installation directory will be inserted into a virtual CD/DVD bulldoze of the VM. Later that, you can see a CD shortcut on the Ubuntu Desktop. The ISO disk contains autorun, and the Guest Additions installer tin be started automatically. Just hit theRun button to showtime installing VirtualBox Guest Additions.

If yous become the warning message "Please install the gcc make perl packages", it means that you have to install these packages commencement then install VirtualBox Invitee Additions.

In gild to install the necessary packages, execute the command:
sudo apt-get install build-essential gcc make perl dkms
You may need to type admin credentials when usingsudo.
After that, reboot your Ubuntu VM:
init half-dozen
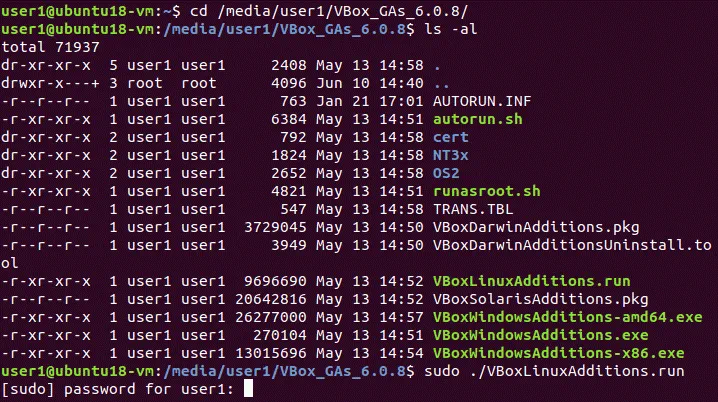
Afterward restarting the VM, open up Linux terminal and get to the directory of the virtual CD with Guest Additions. In our case, the following command is used:
cd /media/user1/VBox_GAs_6.0.8/
Bank check the contents of the directory:
ls -al
Run the Linux installer of VirtualBox Invitee Additions on your Ubuntu on VirtualBox manually:
sudo ./VBoxLinuxAdditions.run
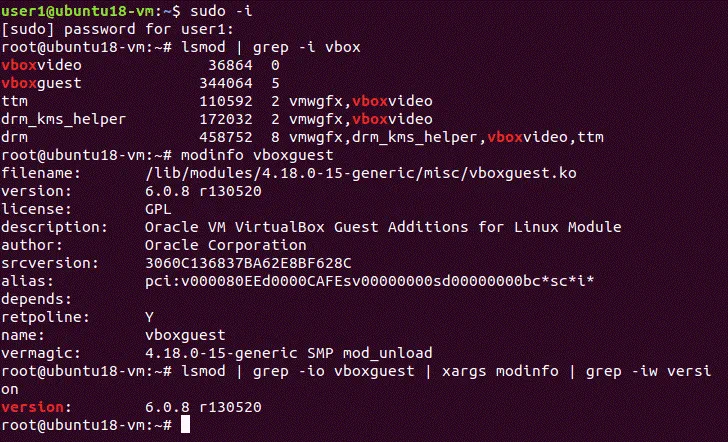
When the installation process is finished, verify whether VirtualBox Invitee Additions accept been installed successfully. Let'due south cheque the appropriate kernel modules that are installed with Guest Additions:
lsmod | grep -I vbox
Check the module information:
modinfo vboxguest
You can check only version of VirtualBox Invitee Additions:
lsmod | grep -io vboxguest | xargs modinfo | grep -iw version
Now you know how to install Ubuntu on VirtualBox. Information technology is also recommended that you install VirtualBox Extension Pack onto your host machine. Read besides our blog post on how to utilise VirtualBox and configure shared folders, shared clipboard, create snapshots etc.
Conclusion
Today's weblog mail explained how to install Ubuntu on VirtualBox. This process is non difficult – you should create a new VM, configure that VM, select a boot deejay ISO paradigm and boot from that installation image. Farther installation procedure of Ubuntu on a VirtualBox VM is similar to installing Ubuntu on a physical machine. After installing Ubuntu on VirtualBox, don't forget to install VirtualBox Invitee Additions on a invitee OS and VirtualBox Extension Pack on a host OS to unlock extra features, meliorate performance and user experience.


Source: https://www.nakivo.com/blog/install-ubuntu-on-virtualbox-virtual-machine/
Posted by: willardwhavence.blogspot.com
0 Response to "How To Install Ubuntu On Virtualbox Windows 7"
Post a Comment